How to Calibrate a Sigma Lens

I love my sigma lenses.  They are fast and sharp, but every now and then they have to be calibrated. When you start to notice it missing focus then you need to either send it off to be calibrated or you can do it yourself!

These are the items you will need to do it yourself:

Camera with the sigma lens

The Sigma USB Dock found here. (about $60)

A Lens Focus Calibration Tool Card is helpful but not necessary. They are inexpensive and, in my opinion, worth it. If you don’t use one you will need an object that is high contrast you can focus on that will help you see where your focus is falling. 

A Tape Measure (optional if you have a lens focus card).

Patience!

Steps:

1.)    Now you are ready to set up your test scene.  Place the lens focusing card or object on a flat and level surface.  This can be the ground or a desk.  Then stretch out the tape measure. Make sure it is stretched out behind and in front of your focusing object.

2.)    Now you are ready to take your test photos. Set your camera to the widest aperture. This will help you determine where the focus is falling. Now take your test photos!  You will take one at 1 ft away, the next one at 2 ft, then around 6 ft and then beyond 6 ft.

3.)    Load your photos into light room or view them straight from your SD card. Zoom in to see where your focus is falling. 

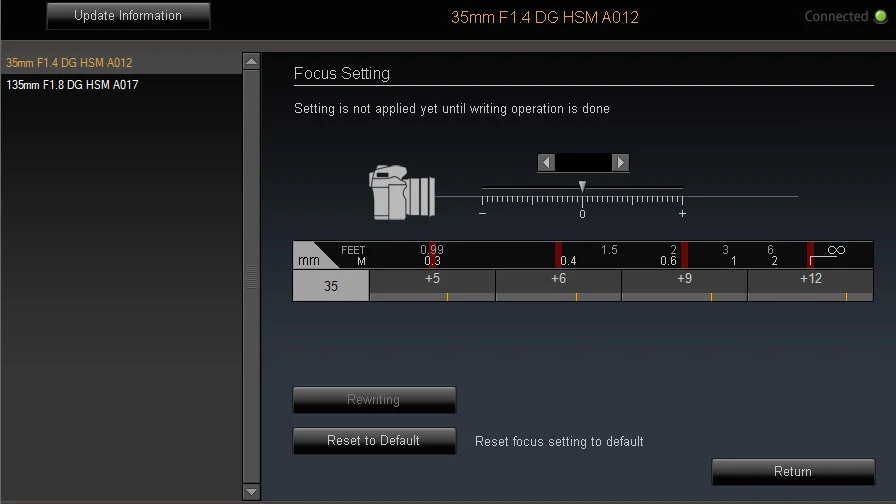
4.)    Take your lens off the camera and attach it to the Sigma dock. It will check for the latest version of firmware.  If you need to update it now would be the time.  Then select the customization button.  Then you can click on focus setting button. And it will take you to a screen that looks like this:

how-to-calibrate-a-sigma-lens-5.jpg

Now you can adjust the focus forwards or backwards according to your needs. As you can see mine was tending to front focus, so I had to push the settings in the positive direction. Make your adjustments slowly and incrementally.  Then select the rewriting button. It will update the focus and now it is time to take your 4 test shots again.  The process starts over from here!

how-to-calibrate-a-sigma-lens-6.jpg
how-to-calibrate-a-sigma-lens-7.jpg

This can be tedious, but it is worth the effort to ensure your focus lands exactly where you want it to!  Check it on occasion to ensure that your lens is focusing correctly! Calibrating a zoom lens is a little different.  You can go to the video tutorial here by Sigma.

 Hope this is helpful! Thanks for reading!

How to Give a Critique

Wow. Let’s just say if you go on the internet at all you will be bombarded by people improperly giving critique.  Critiquing can be so helpful and really aid you in growing as a creator.  It is absolutely necessary to put your work in front of those you trust to gain a new perspective on your work. I know this might be a sensitive topic for some so please allow me to gently offer some thoughts and rules to giving someone a critique.

how-to-give-a-critique-for-art.jpg

1. Don’t give one unless the creator asks for one.

I feel like this is so obvious, but some people feel entitled to give their opinion without anyone actually asking for it.  If you are guilty of this it is completely understandable.  Once you’ve learned a new skill yourself, you want so desperately to pass it on to others.  So perhaps your critique comes from a good place.  However, you have the power as a critic to destroy that joy someone gets from creating.  Consider that with the weight it deserves.  Think of when you were just starting out, and how you were just trying to discover how things worked. Think of the fun you had from just the creative process!  Now think of a time when you shared your creation, and someone ripped it apart. How did you feel? Were you completely defeated? Was that critique offered taken in a constructive and helpful way or did you just want to give up.  It is so easy to dehumanize someone, especially on the internet. Remember that your words have power!

2.  The Feedback Sandwich

Look and think about what you want to say and check the tone in which you deliver this feedback.  Point out the positive things that you think were executed well.  If you can’t come up with anything positive, it’s best to just keep your mouth shut. If you don’t have anything nice to say then don’t say anything at all.  Most of the time you will be able to come up with something positive to say to encourage the creator.  Remember, you want to build them up, not tear them down.  Once you’ve offered some things you think they’ve executed well, then offer specific things they could have improved upon. Making it specific will give the creator something tangible to work on.  Improvement is actually possible at this point and you as the critic aren’t just being hateful.  Next, add something positive again and encourage them to keep working to be even better at their craft.  This will help your feedback to be well received and valued.

3. Check Your Motives

This is really a summary of the other two points.  It goes back to- are you being asked for a critique and is it your goal to help the other person or not?  It’s easy to be prideful when giving a critique.  It’s easy to elevate yourself over this other person who is asking you for your opinion.  It’s easy to tear someone else down to make yourself feel better.  Giving a critique should be helpful and not harmful.  If it is not your intent to be helpful, then it is best to refrain from offering your opinion.   

A Note About Receiving A Critique:

Now when you receive a critique it is easy to be hurt.  This is especially true if your expectations are not met. We as creators put our heart and soul into our art.  Before you react to your critique give it some time.  Just sit with it for a while.  Ask yourself why you are hurt? Was it personal?  Are you so emotionally attached to what you created that you cannot stand back from it and receive a critique?  If you cannot be objective, then you need to step away from it for a while.  Breaks are OK! The first few times you receive a critique are hard, but you do get used to it over time.  And both giving and receiving critique will help you hone your craft! So, get out there and find a group you trust.  Before you know it, you will be improving by leaps and bounds.

How-to-give-critique.jpg

I hope you find this helpful!  I think there are some solid principles in here that you can apply to whatever your hobby (or your friend’s hobbies) might be.  Thanks for reading!       

How to take Back to School Photos

It’s that time of year! All the kids are going back to school. How are you going to document it this year?! Well, I have some tips and ideas for you here:

1.       Tradition

Do you have a first day of school tradition? If not, create one! Our tradition is taking a portrait in front of our driveway every year.  Some people hold a sign or chalk board, others do a front door picture.  Some make sure to get the photo outside of the school. Whatever your tradition is, make sure to stick to it! It is so good to see how your child grows over the years.  Tip: sometimes in that early morning it is pretty dark.  This would be a good time to use your off-camera flash set up!

first-day-of-school-portraits.jpg

2.       The Bus

This is a classic photo for going back to school! If your child rides the bus that moment that they get on is so important.  You will wish you had that documented if you miss it. Perhaps you drive your kids to school.  Then make sure you capture them piling into the car and waiting in the car drop off/pick up line.  Tip: this is the perfect time to use those primary colors that scream school!  Those are yellow (like the bus), red and blue. Or you can be super creative like Meg Bethard was: here.    

waiting-for-the-bus.jpg

3.       Details

You cannot tell a story without details! Show the nervous hands waiting for the bus.  Show the backpacks and new pencils they so carefully picked out.  What was their favorite school supply to pick out?  This year be sure to capture those masks; it really documents the weird time we are in.  Maybe you’re homeschooling, or E-learning this year.  Make sure to photograph their learning environment, and many of these tips can still be used!  

back-pack-detail-for-first-day-of-school-pictures.jpg
nervous-feelings-the-first-day-of-school.jpg

4.       The Interview

This is a yearly tradition for us!  We do a quick interview the day or two before school starts and then I put their answers on the portrait I took of them that first school day. I always try to ask the same questions.  It is so fun to see their answers change as they change each year!  It helps me to mark what their interests are at that moment in time.  Somethings change while others stay the same.   I always ask these questions:

What is your favorite color?

What is your favorite book?

What is your favorite movie?

What is your favorite food?

What do you want to be when you grow up?

It is such a great tradition; I highly recommend you implementing it with your own family!

first-day-of-school.jpg

5.       The Preparations

There is a lot of preparations that are done before the school year begins.  Make sure to capture all these moments: the cereal they eat, the packing their lunches, brushing teeth and hair, the squirrelly energy that happens right before that first day begins at school.  These are all moments that help tell that first day of school story.  

details-of-a-school-lunch.jpg

These are just some ideas on how to remember the new school year.  I’d love to see and hear about your traditions! Feel free to contact me! Thanks for reading!